July 28, 2012

Don Ray, Reclamation

      Sis and I went to an estate sale recently, and I found an Don Ray pen and ink drawing. Don Ray was a Texas artist that was noted for painting western themes and landscapes, who passed away in 2006.
     This was not a purchase; it was a rescue. I found the drawing neglected and grimy with a healthy colony of black mold growing behind the glass. Originally, the drawing was framed in a simple black picture frame under glass with a white mat.Very pretty it must have been; but now, the drawing has yellowed and foxing had occurred. I still would like to display the piece. My cleaning amounted to throwing away the mat and cardboard backing and dabbing the picture with alcohol.
     Using the materials that I already have on hand, I cut a new mat and covered it with fabric making sure that I used a color close to the yellowed drawing.

     After sanding the picture frame, I took it outside and sprayed it with brown Rust-Oleum. And just as the paint began to tack up, I burnished the frame with crumpled gold foil. You can, also, let the paint dry then size the frame and add your foil for a more even look. But I wanted a more sketchy look, so I skipped a step. 

1                                                      2
     1) I would like to create a weathered wood look to the frame, so I applied plaster around the inset of the molding. 
     2) After the plaster dried, I sanded back until I was satisfied with it leaving a little of the gold, cowboy-glam background peeking through. Then I sealed it with Polycrylic.
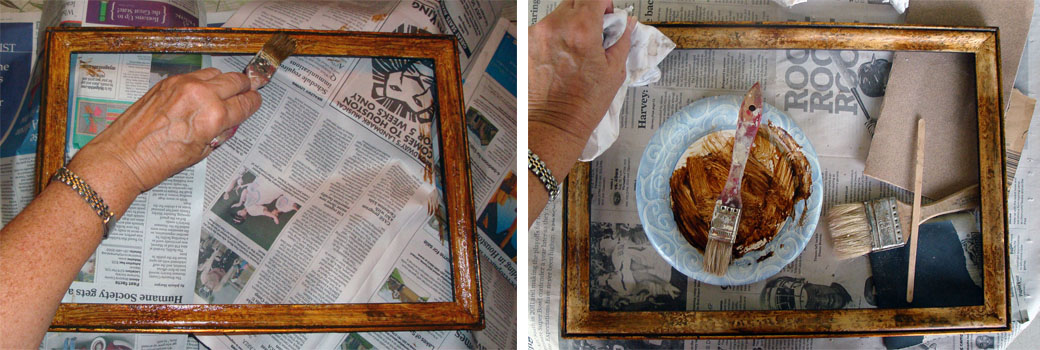
3                                                   4
     3) After the sealer dried, I stained the molding with a water based stain. 
     4) Then, I wiped the stain back to where I felt happy with it. 


And here is the outcome...rustic. 

And here is what it looks like finished. 

     Actually, the picture and frame looked nice at the rustic stage, but I couldn't resist adding some knots and some wood texture to the frame.
     I think Don Ray would approve. I asked, but I only heard from someone named Houdini.


July 18, 2012

Painted Cedar Chest, Completed

Drum roll, please........ 
  To view the before pictures, please go here. 
Yes, finished, but the major steps in getting here were:
Finishing the shield
Glazing the body of the chest
      We used Metal Glow's Pirates Gold as a base coat. Then we mixed Mixol pigments (Rehbraun #3, and Umbra #2) in Perfetto glaze for the translucency of color, and we built up the color in two passes after letting the first pass dry completely. 
 Sealing the chest
     We chose to seal the chest with Faux Effects' Varnish Plus in a satin finish. Although very durable, it is not necessarily a better product than other acrylic topcoats. However, when dry it has a very satiny-tactile feel to it that many others do not have. 
     If you choose to use this product for the first time on one of your projects that has hand painting or glazing done in latex or acrylic, you must first seal your art work before you topcoat with Varnish Plus because VP will cut right through your work, and you will end up with mess on your hands. Although you can brush this top coat on and lightly sand between coats, it is a lot easier to spray.

     This was a fun project....We hate to see it come to an end. You know what would be really pretty for a more feminine feel: do the embossing of the crocodile stencil as an all-over-stencil design; paint the piece pure white with little or no glazing; and add faux straps with pewter or bronze nail heads.....Now, that I'm thinking about it, Michelle Delgado from Wonder Faux carries some really pretty nail heads.......humm.